Loads happening, but a lot needs to be done before she goes in!
So no Blogg entries until we have her sailing, then I'll fill in the blanks.... Just hard to motivate myself after 16 hrs in the workshop everyday!
PhilMac
måndag 16 juli 2012
lördag 23 juni 2012
Yes! It's straight!

So, the hull sits on the keel. Now it is time to tie the frames and ribs together with the keel, before we fit the floors around the keel bolts. To do this I needed to cut sockets into the rabatt to allow for a flush finish so the garboard can sit properly... Only about 40 to cut... A nice afternoons work after the stress of lowering the boat!


And a little more fairing of the stem... But I will complete that when the planking is finished next week.

The knee is connected to the.... Backbone?!
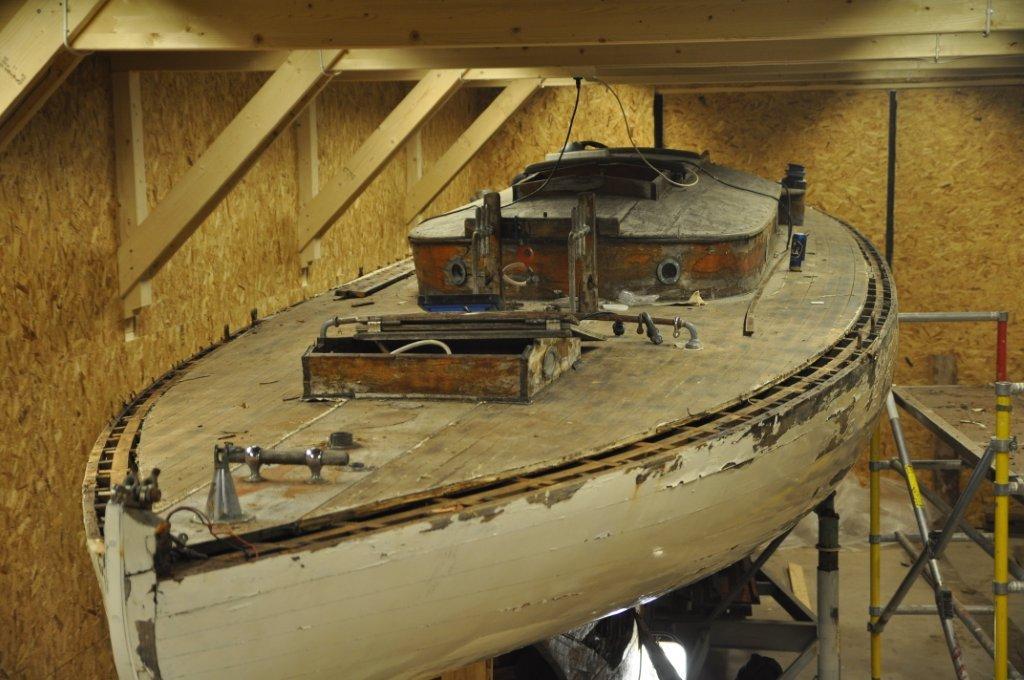
Well sort of! We finally got the hull to a position I felt it was safe to lift it from the hog and keel. This was a very nervous moment ( ok, half a day!) and we don't have pictures of the process. We lifted her with two points fixed to the beams in the workshop, then supported her all round. This allowed us to remove the knee, hog and parts of the stem and sternpost for renewal.
The knee was in dreadful shape.....
 And literally fell apart in my hands!
 Even the bit that held together did not hold up for a more rigorous inspection...
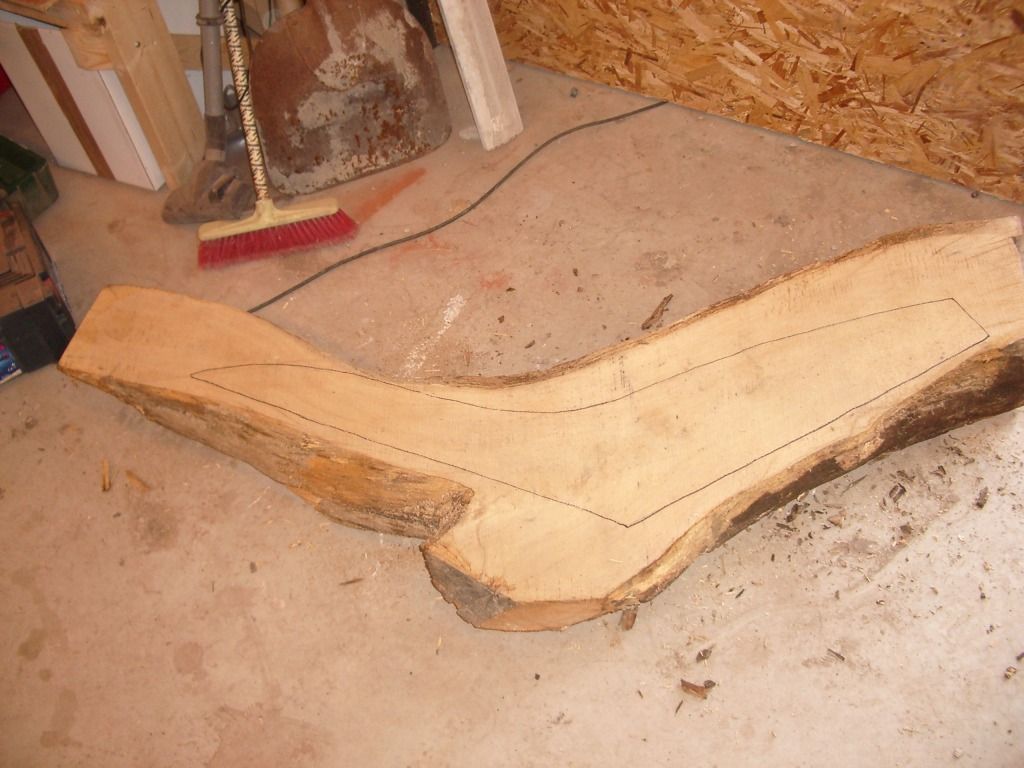
 But we already had a bit of grown oak for the job. Out with the chainsaw and time for some carving...
The first is it roughed to shape with the chainsaw...
 This is it sort of ready for final finishing...

Before I could proceed with it's shaping I needed to make the hog and the bit of the stern-post that needs replacing.
 This is the old hog sat on the oak that will make the new.
 And rough hewn to shape. All the final shaping will be done in situ, to fair it into the keel. the rabatt must be cut after the hog is correctly dimensioned.


You can see the new "backbone" of the boat now all ready to meet up with the rest of the boat hanging over it. This was a really scary process! Lots of running around, different sight-lines and measurements: jacking the keel here, sliding it there... Unti at last it slotted together!


Is it straight?
Well sort of! We finally got the hull to a position I felt it was safe to lift it from the hog and keel. This was a very nervous moment ( ok, half a day!) and we don't have pictures of the process. We lifted her with two points fixed to the beams in the workshop, then supported her all round. This allowed us to remove the knee, hog and parts of the stem and sternpost for renewal.
The knee was in dreadful shape.....


The first is it roughed to shape with the chainsaw...


You can see the new "backbone" of the boat now all ready to meet up with the rest of the boat hanging over it. This was a really scary process! Lots of running around, different sight-lines and measurements: jacking the keel here, sliding it there... Unti at last it slotted together!


Is it straight?
lördag 9 juni 2012
Progress
Well the title is progress... And yes we are progressing! Always too slowly, but hej-ho! Just keep going...
We got a nice picture...

But only because we pulled the transom... Not a pretty sight behind that, rotten and messy. We needed to replace a bit of the "keel" running to the transom and a knee. But thankfully the hood-ends were all in good shape.
 The tarnsom was built with an inner and outer - the inner you can see what is left of it! The outer looks ok - but we will be making new.

The plan is to laminate up from 7mm ply, then a veneer...
The knee was fun to play with, got to use the chain-saw again ;-)

As you can see, my "helper" strolled back after I was finished with the noisy tools. Then some finer shaping...
 And eventually it fitted back in place.

Then it wa stime to scarf in some new wood under it, while Oscar welded up a ring frame to support the new transom... Pictures to come when all is fitted.
We got a nice picture...

But only because we pulled the transom... Not a pretty sight behind that, rotten and messy. We needed to replace a bit of the "keel" running to the transom and a knee. But thankfully the hood-ends were all in good shape.


The plan is to laminate up from 7mm ply, then a veneer...
The knee was fun to play with, got to use the chain-saw again ;-)


Then it wa stime to scarf in some new wood under it, while Oscar welded up a ring frame to support the new transom... Pictures to come when all is fitted.
torsdag 24 maj 2012
The planking work has been progressing. We are working toward the turn of the bilge, replacing all the bad wood - either by scarphing in pieces, or by complete plank replacement. Complete planks have needed to be scarphed because of the stock - only 4 meters in length. But the scarphing tool and epoxy has made this task easier.
When the boat is finished to this point, we will lift her off the keel for the hog and stem work.
The wood is local Gotland's pine - very dense and resinous. A few too many knots to be ideal, but we work around them... And the wood doesn't seem to split at them, probably due to the resin and density.
Just alittle finishing of the scarph on this plank before fitting the last on the this side
 Finally the port side completed... Time to look at the starboard side!
 The first scarph cut for planking replacement, only LOADS more to do! Need to work out some fastenings...

Then out with the plank... How do I turn that flat plank beside into the banana that came out?

 After a little work with saw, plane, angle grinder etc. it seems too fit well!
While I continue with the planking on the starboard side Oscar is stripping the old paint from the port side. This was only sitting there by habit, but we left it there to help keep the moisture content of the wood stable. Now it needs to go, before we spline the hull and paint the primer/barrier coat.

Only a week or two until we are painting her... Hopefully!
When the boat is finished to this point, we will lift her off the keel for the hog and stem work.
The wood is local Gotland's pine - very dense and resinous. A few too many knots to be ideal, but we work around them... And the wood doesn't seem to split at them, probably due to the resin and density.
Just alittle finishing of the scarph on this plank before fitting the last on the this side


Then out with the plank... How do I turn that flat plank beside into the banana that came out?


While I continue with the planking on the starboard side Oscar is stripping the old paint from the port side. This was only sitting there by habit, but we left it there to help keep the moisture content of the wood stable. Now it needs to go, before we spline the hull and paint the primer/barrier coat.

Only a week or two until we are painting her... Hopefully!
torsdag 3 maj 2012
Planking!
Well the planking work has started.
As mentioned earlier we will be replacing the butt-joints in the planks with scarphed "hide-a-butts" glued with epoxy. This is to create a stiffer hull, and remove/replace the damaged end-grain in the planks. While there are a number of butt-joints per side we are minimising the number of "hide-a-butts" by incorporating them into plank repairs when we can - again with glued scarphs ( 8:1).
To ease this I built a little jig to help control the router as I cut into the hull.

This speeded up the process - 13 scarphs cut in the hull in a day! Most of what is needed on the port side. Then the tool was mounted on a bench for cutting the wood.

Neat repeatable 8:1 scarfs... Makes the job so much easier.
Here you can see two of the completed hide-a-butts and the first plank repair - being held in place while I drill for the ribs and frames.

Then it was time to put in one of the most difficult planks - constantly changing dimension, curve, and twist!

This is being held in place for a few days - I have to travel anyway. So that it can get "happy" with its new place in life, before I remove it for final finishing and fitting.
torsdag 19 april 2012
torsdag 15 mars 2012
Real steel!
The last of the ribs and frames have come back from the smithy....
 And these will be fitted next week... But here's a look at some that we have done...
 With nice neat rows of bolts from WESTFIELD.....

Soon we start some woodwork!


Soon we start some woodwork!
Treasure!
Before removing the final ribs ánd frames, I had to remove the mast step.
This proved to be quite a difficult jobb... Having been fastened by the builders with screws, then re-fastened by someone with bolts! But in the end it came free and some of the floors associated with it... All the floors will be replaced as they are quite rotten!
But the mast step itself looks good after a little cleaning....
 While cleaning it up I found the original coin from IrisII launch - a 5 öre from 1901
 Obviously this will be going back when we re-launch, along with a current coin.
This proved to be quite a difficult jobb... Having been fastened by the builders with screws, then re-fastened by someone with bolts! But in the end it came free and some of the floors associated with it... All the floors will be replaced as they are quite rotten!
But the mast step itself looks good after a little cleaning....


tisdag 14 februari 2012
Come on baby light my fire!
No! We haven't given up and set a match to her!
In the depths of winter, we found it too cold in the workshop. The electric heater was on full blast, 24-7, to keep things above zero. Mutterings about kWh pricing from Oscar...
It had always been the plan to install a wood stove, but time had put that to one side... Now was the time!
 Oscar found an old stove in one of the barns... Very rusty and sad... 20 minutes with the Flex machine and it looked perfect for the workshop.
Chimney pipes were installed. I took the pleasure of climbing on the roof - a good sunny day, but kind of cold up there - to complete the installation. Oscar welded a new flue to the stove...Oval to round.

Then we got into some of the disposal of scraps from the boat!

In the depths of winter, we found it too cold in the workshop. The electric heater was on full blast, 24-7, to keep things above zero. Mutterings about kWh pricing from Oscar...
It had always been the plan to install a wood stove, but time had put that to one side... Now was the time!
 Oscar found an old stove in one of the barns... Very rusty and sad... 20 minutes with the Flex machine and it looked perfect for the workshop.
 Chimney pipes were installed. I took the pleasure of climbing on the roof - a good sunny day, but kind of cold up there - to complete the installation. Oscar welded a new flue to the stove...Oval to round.

Then we got into some of the disposal of scraps from the boat!

Nomenclature
I've been having a few "stress-moments" concerning some of the nomenclature I have used on this blogg... It all revolves around my use of the word ribs!
People in "the know" of the boating world are careful of their use of words: the use of the wrong word signifies a sense of ingnorance, and can convey mis-understanding. This can be disconcerting for the most experienced "boater"- finding the correct word - to not show ones ignorance and to clearly convey what one means.
This would not be so much of a problem if "boating" wasn't full of so many weird words. We take it for granted that right and left disappear aboard - replaced by Port and Starboard. Where these words originated is open to conjecture... But my second language - Swedish - gives us some clue to starboard. In swedish this is styrbord... Literally the steering board! It was common practice to have an oar "thingy" on the right side of the boat to steer with... Styrbord... Starboard.
"Boating" has also introduced words and phrases into our language whose origins have long been forgotten. One such is filibustering... English speakers might not know this word, but our american cousins will know this from their government. The word comes from the age of square-rigged ships: while racing, they killed time before the start by spilling wind ( in contrast to the manouvering done by sail boats racing today).. This was termed filibustering.
Now to my dilemma! I have been calling parts of the boat ribs... A number of people claim I am incorrect and should be calling them frames. In some respect they are correct... But...
Frames are supports to the planking of the boat that reach from the keel to the deck and connect to deck beams.
None of these supports on our boat connect to deck beams.
If there is such a supporting member that sits between frames, but does not connect to a deck beam, it is called a timber... Highly inapropriate for our steel-work!
Henceforth all members that stretch from the keel to deck will be called frames... Those steel-oak composite members will be called timbers for the wooden bit, and ribs for the steel bit.
fredag 3 februari 2012
Finally putting things back!
The work on the boat hasn't been going so long... But it has all been removal and destruction. While this is necessary, it can be a little demoralizing. Not to mention a little worrying as less and less seems to be holding the boat together.
But little can be done about it... Just look at these rusted frames and ribs...

As I mentioned in the last post, we had removed 10 pairs of ribs from the boat. These came back from the fabricators, and needed fitting before we could remove any more of the half-ribs or frames. As you can see - Large holes in the structure.

These half-ribs needed some work to "fit" them to the planking and the hog ( or where we assume the new hog will be when we fit it - there being too little left after vacuuming out the rot!). Then they need drilling and bolting in place ( we are using M8 A4 Stainless-steel bolts with washers and nylock nuts to replace the 8mm mild steel rivets that were used - with some luck these will last longer than I need to worry). As most of the planking, that is left, these are fitted to will be re-placed we "dry-fitted" them after cleaning up the planks as best we could.

Once fitted - even though they were not attatched to the hog - they look right, and the boat "feels" stronger... But I was never going to grab the old ones and try and shake the boat!
When we have all the frames and ribs fitted they will need to be tested for "fairness" with battens and "tweaked" with a lump hammer before we can continue with planking and replacing the hog. But they look good so far...

And the starboard ribs ready to fit...

But little can be done about it... Just look at these rusted frames and ribs...

As I mentioned in the last post, we had removed 10 pairs of ribs from the boat. These came back from the fabricators, and needed fitting before we could remove any more of the half-ribs or frames. As you can see - Large holes in the structure.

These half-ribs needed some work to "fit" them to the planking and the hog ( or where we assume the new hog will be when we fit it - there being too little left after vacuuming out the rot!). Then they need drilling and bolting in place ( we are using M8 A4 Stainless-steel bolts with washers and nylock nuts to replace the 8mm mild steel rivets that were used - with some luck these will last longer than I need to worry). As most of the planking, that is left, these are fitted to will be re-placed we "dry-fitted" them after cleaning up the planks as best we could.
Once fitted - even though they were not attatched to the hog - they look right, and the boat "feels" stronger... But I was never going to grab the old ones and try and shake the boat!
When we have all the frames and ribs fitted they will need to be tested for "fairness" with battens and "tweaked" with a lump hammer before we can continue with planking and replacing the hog. But they look good so far...
And the starboard ribs ready to fit...
fredag 27 januari 2012
Support & Supply
One of the rewards of working on a project like this is the people one comes into contact with. One "meets" people on internet forums, when one is searching for product, in general interaction with people. Everyone is interested in such a project - to a greater or lesser extent - and many want to help in any way they can. Some come with advice, recomendation of products, help with supplying products, and not least moral support ( this should never be underestimated: there are many times that the project can be overwhelming, and remembering the kind words can help maintain focus... and composure!).
Some of our suppliers will be getting special mention during the blogg. These are companies that have provided exceptional service in some way - not necessarily just ridiculously good prices. If a company has "sponsored" us I will be very clear that they have, other mentions are for outstanding knowledge, product or service.
One such company is http://www.westfieldfasteners.co.uk/ who have supplied us with stainless-steel fasteners for fixing the new ribs/frames. They have provided excellent quality products, quickly, at very competitive prices. Doesn't really get better!
For those living in sweden that find they need some SS fasteners at good prices, but maybe do not need quantities that will give good discounts - contact me and we can see if we can bulk up on an order ( +46736495401)
Now it's back to the boat. I'm currently cleaning the inside and sanding while some of the ribs are removed, before fitting the new ribs. This is a dirty, smelly job: with almost no comfortable place to be. Hopefully I will be finished tomorrow! Then i can start fitting some ribs.... At long last re-building, not tearing down! :)
PhilMac
torsdag 12 januari 2012
The Ribs are connected to the...
The first, "trial", pair of ribs fitted well... So I bit the bullet and pulled 10 pairs of the half ribs to be sent to the fabricators!
Before removing them it was necessary to support the hull a little more. With so many ribs away and the planking in the keel removed, the bulk of the hull is only resting on the stem and sternpost, and a few very poor ribs. So a support at either end to was placed. The stern lifted about 2 inches - so she had sagged a little - not too much to worry about: and after new planks and splining she will be stiffer and stronger than before.
The bow did not move - which answered a question I had about her shape. In the bow, just above the waterline, she looked a little "hollow" and I was worried she had dropped a little ( maybe because of her bad stem). That she did not return to shape with some force convinces me she was made that way.
This wasn't a hard job now the bilge is open, just tedious, cramped, and dirty ( the ribs in the counter will be a pleasure!). Once "set-up" it only took an afternoon. Pulled about 400 plugs out of the planking that is left, probably only 800 still to pull - for the steel rib jobs. Again this went very quickly - but only after Oscar worked his wonders with a welder and made a tool for the job.
Sadly found some more planking that is beyond saving - but the stern-post seems better than at first glance. The stem is in "dubious" condition, but much seems to be in a previous repair. The repair certainly was functional, but I am not happy with the way it was done and how the planking was fitted to it. Nor indeed the repairs on the planking at that point - two short planks butt joined at the same point in the port forefoot... The continuation of one plank is also very poor - so I'll cut back one and scarf in a new piece, the other will be replaced entirely. Now up to about 210m of planking to be done... Might need to treat myself to a new plane.... ;-)
Left a list of jobs for Oscar to carry on with and returned home to see the family and catch up with some "work".

The sharp eyed amongst you will see Oscar's Plug-tool Mk.1. Despite having removed thousands of plugs over the years - to varying degrees of speed, tidiness, success, this tool makes the job much easier, faster, more accurate, with less risk to the surrounding wood... This is the sort of thing that can make a job like this so much faster and easier - and so help keep motivation levels high.
Oscar is brilliant at this kind of thing. I think when we get the boat finished, I'll help him get on top of his house repairs... Then 2-3 weeks to neatly draw all his ideas, make them, test them, then send them to my patent agent. Some will never be of any commercial success, but at least if they are registered they "get out there" and somebody finds a job easier and maybe even drops a mail to Oscar to say thanks.
torsdag 5 januari 2012
So it begins...
It would be impossible to describe all the preparation that has led up to the start of work: but to give some idea...
Price enquiries with untold number of suppliers. Confirmation of provenance - foolish to start a project of this scale without being certain the boat is as described. Searching for drawings - that have not been found... If anybody can help? Drawing details to help me understand what I want better ( I tend to work a little more "seat of the pants"), so I can delegate work better. Research into other restorations to help with decisions about techniques.
And that is just at my end! Oscar has completely built a workshop, with a good floor and insulated so we can work through anything the Swedish winter can throw at us... Inside an historic barn. This while restoring his house, installing solar heating, maintaining his antique Jaquard loom - and weaving on it, and both of us running our businesses, and holding down a family life!
Anyway work started before christmas. I had a window of 4 days to "begin". My goal was to remove two of the steel ribs - to confirm how we would do it, and to get them to the fabricators so we could ensure that they could live up to their promises ( so as to not leave a cliffhanger - they did! In good time and to price, spec. and quality!).
This meant removing the toe-rails, covering-boards, and garboards. None of this was expected to be hard - just time consuming. Until I found the covering-boards and some of the toe-rails fixed with hand-made nails buried under plugs! Bugger!
Thankfully the wood being removed was never going back onto the boat - so I could be a little brutal - out with the hole saw, cut around the nail, then remove the fastenings after the boards were away.
Then start cutting the fastenings on the ribs I had chosen. I chose two of the short ribs running from the turn of the bilge into the keel - as these are in the first stage of the replacement and would allow us to develop a routine. The steel is overlapped by a wooden rib that continues to the deck. The overlap is about 8cm and hides a rivet... Only one route - cut the rib to get at the rivet and get the steel out in one piece. We will have to scarf a new tale onto all these wooden ribs - 36 in all! This I will make a little longer, and stagger the scarfs to spread the load... More work! But I can make a jig to cut the the scarfs, so it shouldn't be too many more days.


Once the ribs were out we left them at the fabricators, tidied up and I went home to my wife and Christmas... Leaving a list of work for Oscar, if he had the time.
Price enquiries with untold number of suppliers. Confirmation of provenance - foolish to start a project of this scale without being certain the boat is as described. Searching for drawings - that have not been found... If anybody can help? Drawing details to help me understand what I want better ( I tend to work a little more "seat of the pants"), so I can delegate work better. Research into other restorations to help with decisions about techniques.
And that is just at my end! Oscar has completely built a workshop, with a good floor and insulated so we can work through anything the Swedish winter can throw at us... Inside an historic barn. This while restoring his house, installing solar heating, maintaining his antique Jaquard loom - and weaving on it, and both of us running our businesses, and holding down a family life!
Anyway work started before christmas. I had a window of 4 days to "begin". My goal was to remove two of the steel ribs - to confirm how we would do it, and to get them to the fabricators so we could ensure that they could live up to their promises ( so as to not leave a cliffhanger - they did! In good time and to price, spec. and quality!).
This meant removing the toe-rails, covering-boards, and garboards. None of this was expected to be hard - just time consuming. Until I found the covering-boards and some of the toe-rails fixed with hand-made nails buried under plugs! Bugger!
Thankfully the wood being removed was never going back onto the boat - so I could be a little brutal - out with the hole saw, cut around the nail, then remove the fastenings after the boards were away.
Then start cutting the fastenings on the ribs I had chosen. I chose two of the short ribs running from the turn of the bilge into the keel - as these are in the first stage of the replacement and would allow us to develop a routine. The steel is overlapped by a wooden rib that continues to the deck. The overlap is about 8cm and hides a rivet... Only one route - cut the rib to get at the rivet and get the steel out in one piece. We will have to scarf a new tale onto all these wooden ribs - 36 in all! This I will make a little longer, and stagger the scarfs to spread the load... More work! But I can make a jig to cut the the scarfs, so it shouldn't be too many more days.

Finally getting ready to work

Some of our extra "help"

The covering boards on their way - notice the plugs left in the sheer-clamp hiding the bloody nails.


Before and after at deck level

Inspecting the mess after removing the port garboard

Not for the faint hearted - but at least it gives me a good excuse to carve up a nice bit of oak!
Prenumerera på:
Inlägg (Atom)